Wednesday, April 27, 2011

Baby Girl Layout

Here's a baby layout using the Sweetheart Paper Pack.  The layout is loosely based on the "Now You See It Layout" from the book Magic.  The letters and the curly border are from the Storybook Cricut Cartridge.  Then I added the Dimensional Elements after sponging them with matching ink in Cotton Candy, Baby Pink, and Pear.  Some white ribbon and Bitty Sparkles finish the job! 


Cricut Cartridge:
Storybook

CTMH Supplies:
Bitty Sparkles (Z1263)
Sweetheart Level 2 Paper Pack (X7134B)
Pear Exclusive Inks Stamp Pad (Z2197)
Cotton Candy Exclusive Inks Stamp Pad (Z2193)
Baby Pink Exclusive Inks Stamp Pad (Z2102)
White Daisy Grosgrain (Z270)

Other:
1/8" White Satin Ribbon for bow

Monday, April 18, 2011

H2H Bunny Hop

It's time for the Bunny Hop at Heart 2 Heart!  Click the badge to check out all the other wonderful Easter/Spring creations.

This week I'm sharing a little home decor item I put together.  I don't have a lot of Easter decorations, and took this challenge as an opportunity to fix that!
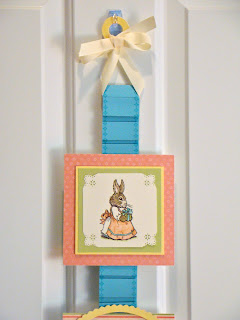
I made a three panel wall hanging using the Caboodle paper pack because I thought the colors were just perfect.  The panels are linked together with a 2" wide strip of pleated Crystal Blue cardstock.  I stamped one of the "Boutique Borders" on the edges to dress it up.  It's hanging from grosgrain ribbon that has been tied to an On Target Dimensional Element that I covered in cardstock and then coated with Liquid Glass to make it pretty.
On to the panels...these "Sensational Season" bunnies are my first attempt at heat embossing.  I really love the effect.  I used a Blending Pen to color the images.  The lacy punches in the corners are from a Martha Stewart punch.  I covered a 6"x6" piece of chipboard with a B&T paper, and stacked the rest of the layers on top with dimensional adhesive.
 I decided to dress up the middle panel a little by applying cardstock and paper to 2 more On Target Dimensional Elements.  It took some time to file the edges smooth, but it really looks great.

Thanks for stopping by to view my creation!  Happy hopping!

Thursday, April 14, 2011

Bargain Shopping

Want to pick up some great items at reduced prices?  Check out what you can get from Close To My Heart (while supplies last) by visiting my online site - click here.  Once you're there, click on "While Supplies Last" in the sidebar.  Happy Shopping!

Tuesday, April 12, 2011

Recycle, Reuse, Repurpose...

This is an interesting challenge at H2H this week.  Basically you're supposed to craft with something that you'd normally just throw away.  At first I had a mental block with this, and decided to work on next week's challenge instead (which I can't wait to share!).  Eventually inspiration hit.  Here's a clue as to what I used:
Recognize it?  My recycled item is the chipboard sheet that holds chipboard embellishments before you punch them out and use them.  I think this particular sheet is the Pizazz Irresistibles.  I started with a piece of White Daisy cardstock and heat embossed in white an image of random stamping from Playful Flourishes.
Next I took the chipboard sheet and used it like a stencil on top of the embossing.  I sponged flowers and leaves in Hollyhock, Smokey Plum, and Pear.  It looked like this when I was finished.
If you ever decide to try this, have some scraps of cardstock handy to mask around the image you are sponging.  The images on the chipboard sheet are really close together, and it's easy to inadvertently sponge the image next to the one you intended to sponge.  To finish turning trash to treasure, I used some Pear and Hollyhock scraps from my last card to finish trimming out this one.  On top of the ribbon are two purple Sparkles.  The sentiment is attached with dimensional adhesive.

This turned out to be a lot of fun.  I like the watercolor-y look to the background I created.  Thanks again for the inspiration, H2H!

Thursday, April 07, 2011

Spring Flower Pop-Up Card

First things first - I can't take credit for the design of the card I'm sharing today.  I decided I wanted to make a card that featured a flower box, and I knew I wanted the flower box to be three-dimensional.  So I googled "Flower Box Card" to see if anyone more clever than I am had figured out a way to do this.  I came across an AWESOME post.  If you in any small way like my card, please check out the original made by Brenda Quintana at Qbees Quest, and consider leaving a comment there.  This talented paper-crafter has laid out a step-by-step tutorial on how to make one of these cards for yourself.  I'm sharing my take on this super-cool pop-up card - my very first pop-up card, by the way!

So, here it is:
The outside of the card is decorated to look like the interior of a house.  I cut up part of a memory protector to be the window "glass".  Instead of ribbon for my curtains I went with patterned paper from the Sophia Paper Pack so the card would be flatter.  I do like the ribbon on the original card, though.

On the back of the card I created a little scene with a table and chairs.  The chairs are from the My Community Cricut cartridge.  I made the table by making a taller thinner chair on my Gypsy and then cutting off the top half.  One thing I added to the original design are the ties at the top of the card.  The fold is actually at the bottom, and I wanted a way to keep the card closed.  I concealed the ribbon beneath some crown molding.


If you undo the bows and open the card, here's what happens:


Ta-daaaaaa!  A cheery spring flower box appears!  All of the flowers are stamped images from the Friendship Blessings stamp set.  I added bitty sparkles to the hyacinths.  I did the random stamping of the "ground" on Pear cardstock with the leaves from Friendship Blessings and the Playful Flourishes stamp set.  The side of the flower box that peeks out the window looks like this:

Turn the card around and you see this:


I used the Walk in my Garden Cricut cartridge to make the sign with the sentiment and the watering can. One last shot of closing the card:


I'm not going to lie...it took FOREVER to create the flowers in the garden.  Cutting out all those little tiny flowers...ugh.  It would have been much faster just to Cricut something instead!  I had a ton of fun putting this card together.  Can't decide if I can possibly bear to give it away to someone, though...

Challenges:  H2H - Showers & Flowers; Fantabulous Cricut - Spring (Pink, Green, Yellow)

LinkWithin

Related Posts Plugin for WordPress, Blogger...