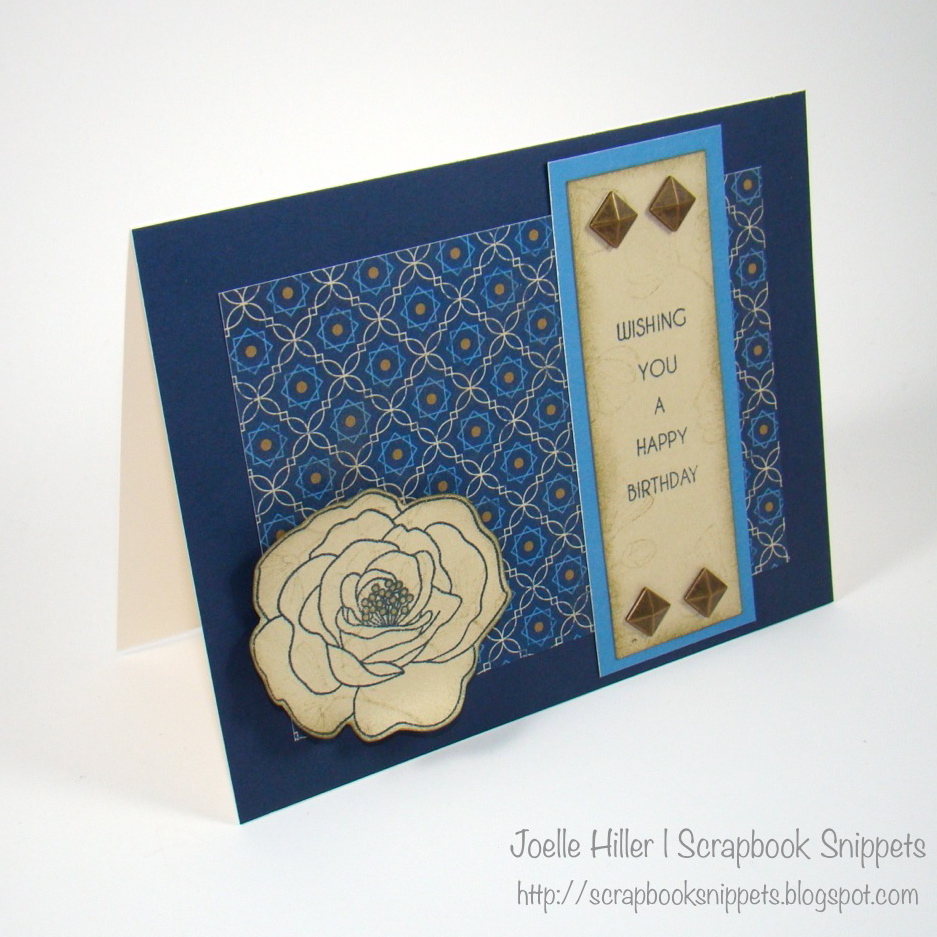
This week at Heart 2 Heart we're celebrating fathers. I created this Father's Day card for my children to give to my husband, who really IS the World's Greatest Dad. I had fun working on this one.
Showing posts with label Heart 2 Heart. Show all posts
Monday, June 11, 2012
Monday, May 28, 2012
H2H - Photo Challenge
I apologize for my laziness in taking pictures. The layout on the left has a flip flap and I didn't feel like trying to get the layout back out of the sheet protector to photograph it.
These pictures are from my daughter's first birthday party. I made the invitations and kept one to put in her album. I cut the card on the fold and put the front in the flip flap, and then put the inside of the card directly on the layout. This way you can open up the invitation and it's totally protected! (Also, I got to sneak in another picture of her.)
I kept the layout fairly simple, because I love the patterns and colors of the Lucy papers. I used the Art Philosophy cartridge for the swirls and the journal box, and added some ribbon to both pages, and that was it.
It's not too fancy, but sometimes you just have to keep moving! Thanks for visiting!
Monday, May 14, 2012
H2H - Polka Dots & Stripes
This week at Heart 2 Heart we're playing with polka dots & stripes. My first thought was the Dotty For You paper pack - of course! I took a moment to look at the inspiration projects, and found the inspiration for a Mother's Day card.
This is the specific item I based my creation on:
I liked the circles on the layout and how the title worked with it. So I pulled out my 1.25" circle punch and used it to punch out pieces of patterned paper. Then I had the Cricut crank out a bunch of 1.5" Colonial white circles.
I spent FOREVER laying out the circles to get them to look just the way I wanted them to. It was a lot trickier than I expected! Some arrangements just did *not* look right.
To embellish I used a few brads & buttons and a pair of flowers.
I really like the original inspiration layout, and might give that a try sometime, too. At least I won't have to mess around with the circles again - Close To My Heart has them perfectly arranged and it would be easy enough just to duplicate what they did.
A little dotty, a little stripey...hope you enjoy it!
Monday, April 30, 2012
H2H - April Showers Bring May Flowers
This week at Heart 2 Heart we're playing around with flowers! I have so many flower stamps and there are so many possibilities with the Art Philosophy Cricut cartridge, that I didn't know where to begin. I've been seeing a lot of "rainbow" creations lately, and that provided the inspiration for my card.
I started by stamping the same flower from the Card Word Puzzle Stamp Set 5 times and cutting them all out. I knew I wanted to cut the front of the card a little short and let the flower petals hang over the edge. Next I pulled out that popular Dotty For You Paper Packet and created the vertical bars.
I pulled out some of my older stamp sets to create the sentiment, which I stamped on a shape from the Art Philosophy Cricut cartridge. One Mother's Day card down, one to go! I hope you decide to join in the fun of this week's challenge at H2H!
Monday, March 19, 2012
H2H - Inspiration Photo
This week at H2H we're using an inspirational photo as a starting point - specifically, this one:
For my card, I used Goldrush cardstock and paired it with Florentine paper. I added some Twilight buttons & ribbon. The sentiment is from the Little Reminder stamp set.
To make the hot air balloon, I used the 1.25" circle punch to punch out two Goldrush circles, one Vanilla Cream circle, and then I made that top Goldrush piece by doing two punches on one piece. I layered them all, then cut out the basket shape. I used Waxy Flax to add the ropes.
Thanks for visiting!
Monday, February 20, 2012
H2H - Sketch Week
This week at Heart 2 Heart, we're given a sketch to use as inspiration. I tweaked the sketch a little and came up with this card:
I really enjoy the Pemberley paper paired with Outdoor Denim, Indian Corn Blue, and Bamboo.
The stamped images are from the Card Word Puzzle Stamp set. I did some second generation random stamping behind the sentiment and on the flower which gives a faint hint of pattern. Thanks for visiting and be sure to join in the fun at H2H!
Monday, February 06, 2012
H2H - For the one you love
This week at Heart 2 Heart we are helping you finish off your Valentine's Day crafting by having you share something you made for someone you love. The project I'm sharing is a candy box I made for my two kids. I chose the Lucy cardstock because it has the pinks for Valentine's Day in it, but it's more subtle so the box can be reused for something else after the holiday.
I started with a Close To My Heart Card Box and covered it with cardstock. I then cut out all the decorations you see on the lid using the Art Philosophy Cricut cartridge. I added some buttons and the new baker's twine (love it!).
When you open the box, you see the top tray which holds 6 flowers with Hershey kiss centers. I cut the flowers using the Art Philosophy Cricut cartridge (cut at 5") and used Liquid Glass to hold them together. By creating a tray I was able to add a second layer.
I really like the colors of the Lucy cardstock. After Valentine's Day this will make a nice keepsake box for my daughter. Thanks for stopping by! Comments welcome!
I started with a Close To My Heart Card Box and covered it with cardstock. I then cut out all the decorations you see on the lid using the Art Philosophy Cricut cartridge. I added some buttons and the new baker's twine (love it!).
When you open the box, you see the top tray which holds 6 flowers with Hershey kiss centers. I cut the flowers using the Art Philosophy Cricut cartridge (cut at 5") and used Liquid Glass to hold them together. By creating a tray I was able to add a second layer.
When you remove the top tray, there's another layer of 6 flowers underneath.
Monday, January 23, 2012
H2H - Inspiration Photo
This week at H2H we're using a photo as inspiration - specifically, this photo:
I decided to use the Art Philosophy Cricut Cartridge to make a tag card. I cut the card at 5.5". I used Chocolate cardstock as the background and added a bit of Dreamin' paper that mimicked the leaves in the inspiration photo. The baker's twine is new from CTMH and will be available in February! I was very excited about that.
I embossed the card with clear embossing powder on the background and the sentiment - it's hard to photograph, but you can kind of tell in the next picture. Both images came from one of the Art Philosophy stamp sets.
The base of the tag is decorated with Opaques and flourishes from the Limited Edition stamp set. The last piece I added was the acrylic tag attached to the baker's twine. I think it came from a Connections Club reward from awhile ago. I added two coats of liquid glass on top and the snippet of paper underneath. I loved all those clear shiny shapes in the inspiration photo and tried to add some of that shine to this card.
I love the clear embossing powder. It adds such a nice texture and shine to stamping. You have to see it in person to really get the full effect. Are you inspired? Please share your creations at Heart 2 Heart! Don't forget, this is a CTMH challenge blog, so make sure you've used some CTMH products in your work!
I decided to use the Art Philosophy Cricut Cartridge to make a tag card. I cut the card at 5.5". I used Chocolate cardstock as the background and added a bit of Dreamin' paper that mimicked the leaves in the inspiration photo. The baker's twine is new from CTMH and will be available in February! I was very excited about that.I embossed the card with clear embossing powder on the background and the sentiment - it's hard to photograph, but you can kind of tell in the next picture. Both images came from one of the Art Philosophy stamp sets.
The base of the tag is decorated with Opaques and flourishes from the Limited Edition stamp set. The last piece I added was the acrylic tag attached to the baker's twine. I think it came from a Connections Club reward from awhile ago. I added two coats of liquid glass on top and the snippet of paper underneath. I loved all those clear shiny shapes in the inspiration photo and tried to add some of that shine to this card.
I love the clear embossing powder. It adds such a nice texture and shine to stamping. You have to see it in person to really get the full effect. Are you inspired? Please share your creations at Heart 2 Heart! Don't forget, this is a CTMH challenge blog, so make sure you've used some CTMH products in your work!
Monday, January 09, 2012
My First H2H Design Team Post!!
This week at Heart 2 Heart it's time to use a stamp set you've never used before, or one you haven't touched in awhile. This was the *perfect* challenge for me, since I am the proud new owner of the CTMH Exclusive Art Philosophy Cricut Cartridge (thank you, Santa!). With the cartridge you get three awesome D-size stamp sets. I was in need of an anniversary card, so I took this opportunity to play with my new toys.
The stamp set I haven't used before is D1497 - it comes with the cartridge, but I couldn't find a name for this set. If someone knows it, leave me a comment and I'll update my post. I used the star, banner, and heart stamps on Sorbet cardstock cut with my Cricut - sooooo fun!
A piece of Elemental cardstock serves as the background, layered onto Desert Sand cardstock. Colonial white waxy flax is threaded through the banners and buttons.
It's hard to tell from the photos, but the heart is attached with foam tape and the sentiment stripe sneaks underneath. The sentiment is from the Say It In Style stamp set and stamped in Indian Corn Blue. The little blue circle is one of the Elemental Complements Dimensional Elements that coordinates with the paper pack. If you haven't picked up the Elemental Paper Packet yet, you really need to! It's so versatile and can be used for a variety of occasions/layouts.
Thanks for reading! I'm so excited and thrilled to be part of this Design Team. The only thing more exciting is waiting to see what you come up with! We'd love to have you participate in this challenge - just remember that you need to use Close To My Heart products in your artwork.
Tuesday, January 03, 2012
Fun News!
I have been accepted as a Design Team member for my favorite challenge blog Heart 2 Heart! I was thrilled to find out I made it onto the team - there have been so many talented Design Team members that I have been inspired by, and I'm honored and humbled to take a turn.
I'm also really excited because I haven't been doing much scrapbooking or card-making lately, so this will motivate me to jump right back in!
If any of you haven't bumped into me before on the 'net, I'd love to have you join me as a follower, and I hope to meet you joining in on the challenges at Heart 2 Heart.
Also, I'd like to give a shout-out to my upline, Mary of Mary Gunn FUNN, who also made it onto the Design Team. Congrats, Mary! I'm looking forward to trying to keep up with you :).
Thursday, December 15, 2011
Christmas Cards
I wanted to come up with a simple Christmas card design this year that wouldn't take too long to make. But I kept fiddling with it, and I ended up with something more time-consuming than I really wanted. Punching the edges of the card took a long time. Making one isn't bad...twenty-five is a little much. And then I couldn't just stamp and be done with it. I decided to use clear embossing powder to fancy it up a bit.
You can see the shine and texture a little bit in this photo.
And then the strips of Mistletoe paper on the inside, the cranberry strips on the outside, the bow... so these cards are still a work in progress. AND I still have to go back and stamp a sentiment on the inside. My daughter seems to be rearranging the furniture, so off I go... Merry Christmas!
Thursday, November 17, 2011
H2H - Metal Mania
I'm a little late getting to this challenge from Heart 2 Heart, but I really wanted to play along because I hardly ever use metal in my crafting. I'm a little intimidated by it, I think because I'm not sure what adhesive to use with it. I ordered the metal photo hangers from Close To My Heart a long time ago and have been working up the courage to use them. I crafted this card for my Dad for his birthday.
I used the You & Me Paper Pack and made the tag from a recent Stamp of the Month set...I think it was called Limited Edition? The photo hanger clipped on easily with the brads included (totally NOT intimidating).
And I did a little bit of stamping on the inside...
Thanks for stopping by to visit!
Saturday, November 05, 2011
H2H - Color Challenge
This week at Heart 2 Heart, they are spotlighting the colors of Autumn Terracotta, Bamboo, and Juniper. I used this palette to make the circle card here:
Of the three colors, the only one I had an ink for was Juniper, so I switched to using Cocoa to do most of the stamping. The leaves are from Nature's Vein, the sentiment is from Unscripted (as is the border I created on the band of Juniper), and the swirl border is from Wicked. I curled the edges of the leaves to add some interest.
Monday, September 05, 2011
H2H - Color Combo
This week we're supposed to share our favorite color combo at Heart 2 Heart. I've been working on things for my daughter lately and the color combo I've been using the most is Hollyhock, Blush, and Pear...from the Sophia Paper Pack! Not very original, but I really do like it. I like how the Pear really stands out.
First, here are a few photos of the invitations I made for my daughter's first birthday party:
I've also done some scrapbooking with the same colors. The first layout I posted about previously. Here's the link if you want more details.
And here are a few new pages I've finished recently.
If you look closely at the layout above, you can see that on the right page I stamped some flower images and used foam tape to put them on top of the patterned paper. It gives a nice 3D look to the paper.
On this layout I wanted to use a lot of pictures and wanted to minimize the paper I used, to make it last a little longer. I did mat the photos to give the layout a little extra color.
I've gotten down to the point where I really only have a few scraps of this paper pack left. I'm not sure if I'll be able to squeeze out one more layout, or if it will be time to switch to something new...stay tuned!
Monday, August 08, 2011
H2H - Simple Sun Card
The theme this week at Heart 2 Heart is Hot, Hot, Hot! In celebration of summer (which has actually taken a cool turn around here, ironically enough) I crafted this simple sun card:
I thought about embellishing it, but ribbon or more stamped images just made that beautiful blue sky look too cluttered. So this design stayed clean & simple, which also made it relatively quick to put together - a nice bonus!
The sun is made with a 1 1/2" circle center, stamped with images from Dream Big and Connections on Sunny Yellow cardstock. I then stamped the pennants from the Pennant Alphabet using Sunflower ink on Sunny Yellow and Sunflower cardstock. The sky is...well, Sky cardstock, of course! Last, I used the clouds from Around the Block and stamped them in Pacifica ink. The sun is attached with foam tape.
The colors are more bright and cheerful than I was able to capture on this cloudy day. Enjoy the rest of your day!
Thursday, August 04, 2011
Child's Birthday Card
I combined two challenges in my latest card creation. Heart 2 Heart is celebrating kid's birthdays this week and the a la Card Monkey Monkey Challenge #67 is a celebration card with pennant.I made this card using the new Zoology Stamp Set, which I'm having a lot of fun with. The animals are stamped in Smokey Plum and Sunflower. The balloons came from a different set. I used some embroidery floss to stitch the balloon string around each animal. The star border and the Celebrate Banner came from the July Stamp of the Month.
Next I layered on some cardstock pennant triangles separated by tiny Licorice Opaques. You can also see the little dabs of glitter glue I added to some of the stars here:
The result is a whimsical little card. I think it could be done up in a variety of color palettes and look really cute. The Sunflower cardstock & ink is kind of overpowering in the pictures, but is less obnoxious in person. The Smokey Plum isn't as dark as it looks here. Today was not a good picture-taking day for me!
Tuesday, July 26, 2011
H2H - Converse Sneaker Card :)
I needed a birthday card for my nephew and was having trouble thinking up something fun. When I first saw the H2H Sketch for this week, it didn't seem like it was going to help me out much. But I kept staring at it, and one thought led to another, and here's where I ended up:
My Converse-inspired birthday card! My nephew is athletic and this just seemed like a fun idea. I started googling Converse sneakers and I was inspired by the styling of them, and I knew I could make it fit the sketch. I did alter the sketch a bit - rotating it, and changing up the square to be the Converse circle.I started with a piece of Tulip cardstock which (even though you can't really tell from the photo) has been lightly sanded to make it look like canvas. Next I used white embossing powder to make the stitches (from the You & Me Stamp Set). The alphabet is Tiny Typewriter.
If I were to do this one over again, I would have used liquid glass on the shoelace grommets just for fun. I really do want to make more of these cards. There are so many cool Converse out there to be inspired by.
Subscribe to:
Posts (Atom)